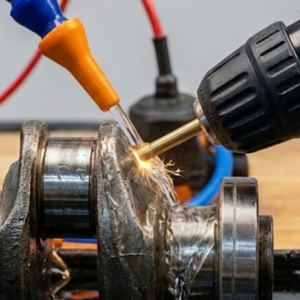
EDM Tap Remover - How it works
EDM Removal Process
Step 1 – Install the Electrode
Select the appropriate electrode size for the broken tool and install it into the EDM machine.
Step 2 – Position the Machine
Position the EDM machine so that the electrode is aligned directly above the broken tap or tool.
Step 3 – Set Up Water Flow
Position the water pump nozzle so that water flows over the electrode and the broken tool during the process.
Optional:
A small water dam can be created around the work area so that the electrode and broken tool remain submerged. This improves cooling and flushing during the EDM process.
Step 4 – Fill the Water Tank
Fill the EDM machine’s water tank with distilled water, (distilled water is preferred but tap water also works) which acts as the dielectric fluid during the electrical discharge process.
Step 5 – Set Machine Parameters
Adjust the EDM machine settings including:
- Processing depth
- Power level
- Feed rate
Set the desired erosion depth for the broken tool.
Step 6 – Start the EDM Process
Start the EDM machine and allow the system to begin spark erosion.
For safety, the operator should remain clear of the electrode area during operation.
The EDM machine will gradually erode through the broken tool using controlled electrical sparks, allowing the remaining tool material to be removed without damaging the workpiece.
Result
Once the EDM process is complete, the broken tool material will be removed and the original hole can often be re-tapped or reused, saving expensive components from being scrapped.
Video Example
Photo Examples